Job scheduling on HPC servers using SLURM
Learning objectives
- Understand the necessity for, and use of job scheduling software on High Performance computer servers.
Overview
Slurm is an open source, fault-tolerant, and highly scalable cluster management and job scheduling system for large and small Linux clusters. Slurm requires no kernel modifications for its operation and is relatively self-contained. As a cluster workload manager, Slurm has three key functions. First, it allocates exclusive and/or non-exclusive access to resources (compute nodes) to users for some duration of time so they can perform work. Second, it provides a framework for starting, executing, and monitoring work (normally a parallel job) on the set of allocated nodes. Finally, it arbitrates contention for resources by managing a queue of pending work
Architecture
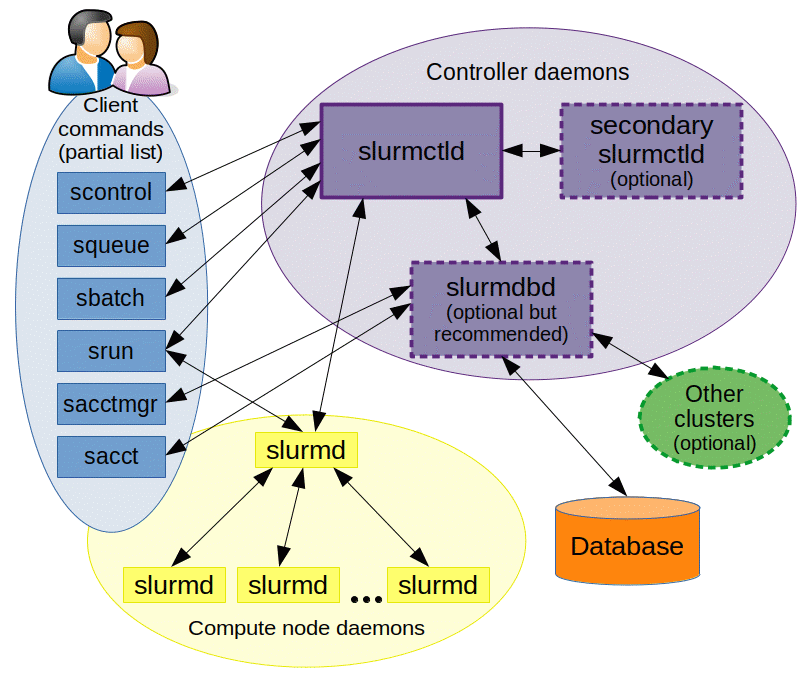
As depicted in Figure 1, Slurm consists of a slurmd daemon running on each compute node and a central slurmctld daemon running on a management node (with optional fail-over twin). The slurmd daemons provide fault-tolerant hierarchical communications. The user commands include: sacct, sacctmgr, salloc, sattach, sbatch, sbcast, scancel, scontrol, scrontab, sdiag, sh5util, sinfo, sprio, squeue, sreport, srun, sshare, sstat, strigger and sview. All of the commands can run anywhere in the cluster.
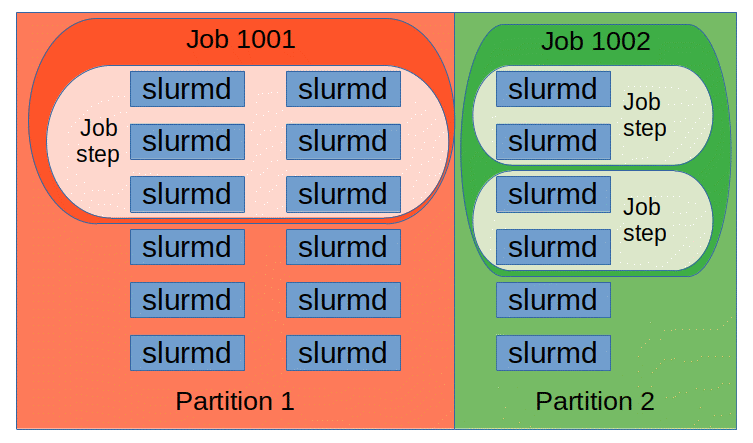
The entities managed by these Slurm daemons, shown in Figure 2, include nodes, the compute resource in Slurm, partitions, which group nodes into logical (possibly overlapping) sets, jobs, or allocations of resources assigned to a user for a specified amount of time, and job steps, which are sets of (possibly parallel) tasks within a job. The partitions can be considered job queues, each of which has an assortment of constraints such as job size limit, job time limit, users permitted to use it, etc. Priority-ordered jobs are allocated nodes within a partition until the resources (nodes, processors, memory, etc.) within that partition are exhausted. Once a job is assigned a set of nodes, the user is able to initiate parallel work in the form of job steps in any configuration within the allocation. For instance, a single job step may be started that utilizes all nodes allocated to the job, or several job steps may independently use a portion of the allocation.
Commands
Man pages exist for all Slurm daemons, commands, and API functions. The command option --help also provides a brief summary of options. Note that the command options are all case sensitive.
srun is used to submit a job for execution or initiate job steps in real time. srun has a wide variety of options to specify resource requirements, including: minimum and maximum node count, processor count, specific nodes to use or not use, and specific node characteristics (so much memory, disk space, certain required features, etc.). A job can contain multiple job steps executing sequentially or in parallel on independent or shared resources within the job's node allocation.
salloc is used to allocate resources for a job in real time. Typically this is used to allocate resources and spawn a shell. The shell is then used to execute srun commands to launch parallel tasks.
sattach is used to attach standard input, output, and error plus signal capabilities to a currently running job or job step. One can attach to and detach from jobs multiple times.
sbatch is used to submit a job script for later execution. The script will typically contain one or more srun commands to launch parallel tasks.
scancel is used to cancel a pending or running job or job step. It can also be used to send an arbitrary signal to all processes associated with a running job or job step.
sinfo reports the state of partitions and nodes managed by Slurm. It has a wide variety of filtering, sorting, and formatting options.
scontrolis the administrative tool used to view and/or modify Slurm state. Note that many scontrol commands can only be executed as user root.
Examples
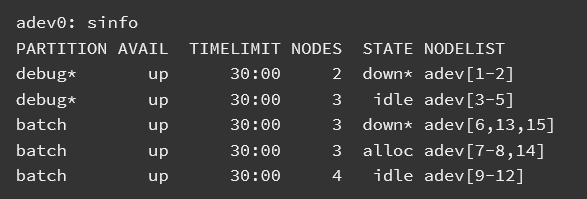
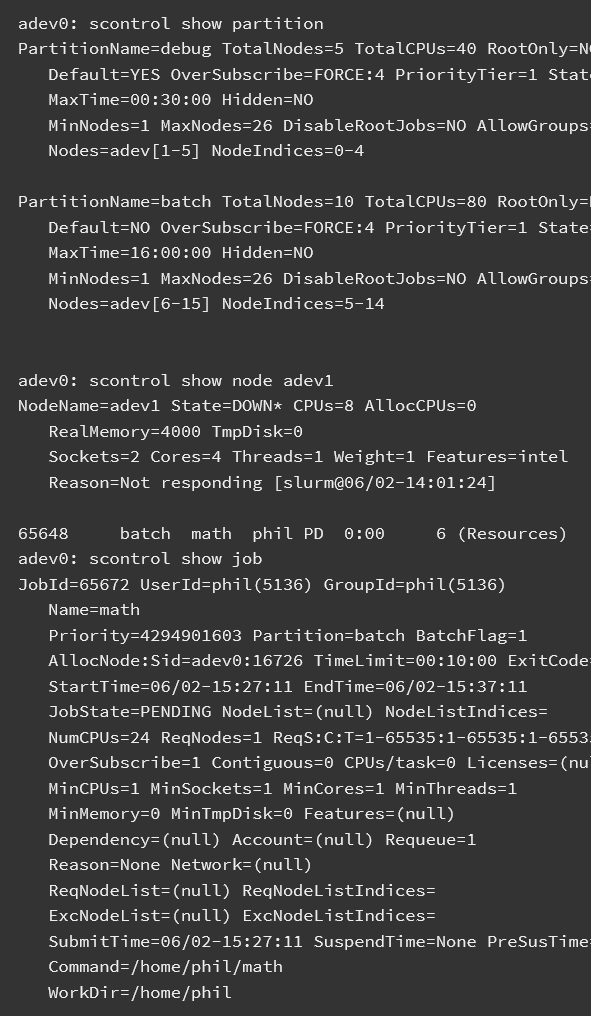
First we determine what partitions exist on the system, what nodes they include, and general system state. This information is provided by the sinfo command. The * following the name debug indicates this is the default partition for submitted jobs. We see that the partitions are in an UP state. Some configurations may include partitions for larger jobs that are DOWN except on weekends or at night. The information about each partition may be split over more than one line so that nodes in different states can be identified. In this case, the two nodes adev[1-2] are down. The * following the state down indicate the nodes are not responding. Note the use of a concise expression for node name specification with a common prefix adev and numeric ranges or specific numbers identified. This format allows for very large clusters to be easily managed. The sinfo command has many options to easily let you view the information of interest to you in whatever format you prefer. See the man page for more information.
On the lab417 server that we are working on, we only have one partition, agrp. To access the server we used the command srun to allocate each user a node/cpu.

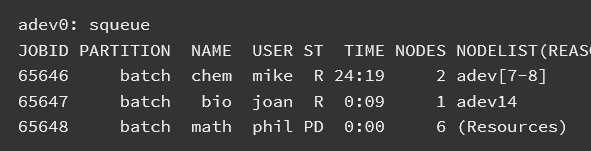
Next we determine what jobs exist on the system using the squeue command. The ST field is job state. Two jobs are in a running state (R is an abbreviation for Running) while one job is in a pending state (PD is an abbreviation for Pending). The TIME field shows how long the jobs have run for using the format days-hours:minutes:seconds. The NODELIST(REASON) field indicates where the job is running or the reason it is still pending. Typical reasons for pending jobs are Resources (waiting for resources to become available) and Priority (queued behind a higher priority job). The squeue command has many options to easily let you view the information of interest to you in whatever format you prefer. See the man page for more information.
The scontrol command can be used to report more detailed information about nodes, partitions, jobs, job steps, and configuration. It can also be used by system administrators to make configuration changes. A couple of examples are shown below. See the man page for more information.
Running Interactive Jobs
Login nodes are primarily intended to be used for logging in, editing scripts, and submitting batch jobs. Interactive work that involves substantial resources—either memory, CPU cycles, or file system I/O—should be performed on the compute nodes rather than on login nodes.
Interactive jobs provide a shell prompt on a compute node. This allows users to execute commands and scripts "live" as they would on the login nodes, with direct user input and output immediately available. Interactive jobs may be submitted to any partition and are subject to the same time and node limits as non-interactive jobs.
Interactive jobs can be run in the shell using the srun command. We have used this command on the first day to gain access to the lab417 server.
srun --cpus-per-task=1 -t 0-2:30 --mem 1G --pty /bin/bash
Batch Jobs
Most jobs submitted to an HPC wil be batch jobs. Batch jobs are run by submitting a job script to the scheduler with the sbatch command. Here's how to run an extremely simple batch job on the system. The following batch script, named simple_cmd.sh, executes a few trivial shell commands rather than a real application:
#!/bin/bash
#SBATCH -p agrp
#SBATCH -t 00:01:00
#SBATCH -N 1
#SBATCH -n 1
# Print date
date
# Verify that sleep 5 works
time sleep 5
Notice that the script contains several special #SBATCH comments. This is one way (in fact, the preferred way) to pass job attributes to Slurm. Doing so is necessary because the following attributes must be defined for every job on lab417
| Meaning | Flag | Value | Example |
|---|---|---|---|
| Partition/queue name | -p |
queueName | -p agrp |
| Time limit (wall time) | -t |
hh:mm:ss | -t 00:05:00 |
| Number of nodes | -N |
1..queueMaxNodes | -N 1 |
| Number of tasksnodes | -n |
1..[nodes * cores] | -n 1 |
| Project name (if you have > 1) | -A |
projectName | -A A-P12345 |
Optional Job Attributes
| Option | Flag | Value | Example |
|---|---|---|---|
| Job name | -J |
any string | -J SimpleJob |
| Stdout | -o |
(path and) filename | -o $HOME/project1/%j.out |
| Stderr | -e |
(path and) filename | -e $HOME/project1/%j.err |
| Email address | --mail-user= |
email@domain | --mail-user=genius@gmail.com |
| Email event type | --mail-type= |
{BEGIN, END,
FAIL, ALL, etc.} |
--mail-type=ALL (email notification
at start and end of job, or failure) |
The batch job simple_cmd.shcan be run with the following command:
sbatch simple_cmd.sh
Example of a batch job to run busco analysis on lab417.
#!/bin/bash
#SBATCH --partition=agrp          # Specifies the partition (queue) to use (e.g., 'agrp')
#SBATCH --time=14-00:00:00        # Maximum wall time for the job (14 days)
#SBATCH -N 1                      # Number of nodes to allocate (1 node)
#SBATCH -n 1                      # Number of tasks to run (1 task)
#SBATCH --cpus-per-task=10        # Number of CPUs per task (10 CPUs)
#SBATCH --mem 100G                # Memory required per node (100 GB)
#SBATCH --error=busco.%J.err      # File to store standard error output (%J is the job ID)
#SBATCH --output=busco.%J.out     # File to store standard output (%J is the job ID)
#SBATCH --mail-user=evilliers@gmail.com  # Email address for job notifications
#SBATCH --mail-type=ALL           # Send emails for all job events (start, end, fail)
#SBATCH --job-name=busco          # Name of the job (appears in the queue)

# Load necessary modules or activate a virtual environment
source ~/miniconda3/etc/profile.d/conda.sh
conda init bash
conda activate busco

# Define input and output paths
INPUT_FASTA="/home/evilliers/work/galjoen_genome/2023_11_25_Dichistius_capensis_flye_assembly/assembly.fasta"
OUTPUT_DIR="/home/evilliers/work/galjoen_genome/2023_11_25_Dichistius_capensis_flye_busco"
LINEAGE="actinopterygii_odb10"

# Run BUSCO

busco -i ${INPUT_FASTA} \
      -m genome \  # Assessment MODE: genome, proteins, transcriptome
      -l ${LINEAGE} \ # Lineage
      --download_path ~/busco_downloads \ # The location of the downloaded BUSCO Lineage datasets
      -c ${SLURM_CPUS_PER_TASK} \  # Automatically uses the allocated number of CPUs
      -o ${OUTPUT_DIR}
Explanation of Each Line
#!/bin/bash: Specifies that the script should be executed using the Bash shell.
#SBATCH --partition=agrp: Specifies the partition (queue) to which the job will be submitted. Replace agrp with the appropriate partition name for your cluster.
#SBATCH --time=14-00:00:00: Sets the maximum wall time for the job. In this case, the job can run for up to 14 days (14-00:00:00).
#SBATCH -N 1 : Requests 1 node for the job.
#SBATCH -n 1 : Specifies that 1 task will be run.
#SBATCH --cpus-per-task=10 : Allocates 10 CPUs per task.
#SBATCH --mem 100G : Requests 100 GB of memory for the job.
#SBATCH --error=busco.%J.err : Specifies the file to which standard error output will be written. %J is replaced with the job ID.
#SBATCH --output=busco.%J.out : Specifies the file to which standard output will be written. %J is replaced with the job ID.
#SBATCH --mail-user=evilliers@gmail.com : Specifies the email address to which job notifications will be sent.
#SBATCH --mail-type=ALL : Configures the job to send email notifications for all events (e.g., job start, end, failure).
#SBATCH --job-name=busco : Sets the name of the job to busco. This name will appear in the job queue.
How to Submit the Job
Save the script to a file, e.g., submit_busco.sh.
Make the script executable:chmod +x submit_busco.shSubmit the job to the Slurm scheduler:
sbatch submit_busco.sh
If any command-line options conflict with those in the batch script, the ones on the command line take precedence. Most flags have a short form (e.g., -N) and a long form (e.g., --nodes).
Slurm has many more options that let you set various kinds of attributes for your jobs. We'll take a look at some of these optional job attributes in a later section.
Problems Running Jobs
There can be many reasons why jobs don't advance in the queue or fail after they start running. Here we cover a few common issues and suggest some things to try.
Job gets "stuck" in the queue
When your job doesn't seem to be making progress in the queue, it might not be your fault at all, but rather a matter of other jobs having priority over yours for a variety of reasons. Some of the factors that influence scheduling on lib417 are:
Fairshare - Jobs submitted by users who haven't run many jobs recently will get some degree of priority over jobs submitted by users who have been using resources heavily.
Reservations - Blocks of time may be reserved on all or part of Frontera for special situations such as workshops, full-scale runs, or maintenance windows. A job will not be scheduled if it would interfere with such a reservation.
Backfill - Sometimes a small, quick job can run to completion while larger, queued jobs are waiting for nodes to free up. If so, the smaller job will be scheduled ahead of the larger ones.
Queue limits - As outlined in Queues, all users are subject to queue-dependent limits on the number of jobs that they can run at one time. Jobs in excess of the limit will remain in the queue, even if resources are available.
No data from job
When there is no output, there is a strong chance that the job simply failed. Check the stderr and stdout files (usually the job number is contained in the filenames) to make sure nothing went wrong.
Another possibility is that the output files were actually written, but not to the place you expected. In particular, if your application writes any files to/tmp, be sure that your batch script copies these files to $WORK, $HOME, or $SCRATCH prior to exiting.
File or command not found
Generally a missing file is due to a path problem. For example, you will get an error if you try to launch an executable with srun my_prog, because your $PATH does not automatically include the current working directory. A correct syntax is srun ./my_prog (assuming the file is in the current working directory). Similarly, be sure to load any environment modules that are needed to set up the $PATH and $LD_LIBRARY_PATH for your job, either at the time you submit the job, or explicitly in your batch script. This problem can be circumvented by loading the neccesary software using conda for example in the busco analysis script above.
Reason for failure is unclear
Perhaps your job failed because you were trying to do too much at once?
- Break down your batch script into smaller steps that run on fewer nodes, and test the steps separately or incrementally.
- Give yourself more output: echo the name of each step prior to taking that step in the script, list the contents of relevant directories, echo the values of environment variables, etc.
- Be sure you understand what your job is doing at each stage so you can diagnose the underlying issue.
Starting an interactive job with srun and executing the job script line by line, while checking the output at each step, may be helpful in this regard.
Exercise - Managing Jobs
In this exercise, we will try out some of the Slurm commands that let you track the progress of your jobs and manage them in the queues. Our batch script in this case doesn't really have to do anything useful, but the job does have to last long enough for you to take certain actions on it.
The following script will suffice. Create it in an editor (or with cat >) and call it simpleJob.sh:
#!/bin/bash
#SBATCH -J simpleJob
#SBATCH -o simpleJob.%j.out
#SBATCH -e simpleJob.%j.err
#SBATCH -p agrp
#SBATCH -N 1
#SBATCH -n 1
#SBATCH -t 00:10:00
# Uncomment next line and specify a project, if you have more than 1 project
##SBATCH -A <your account>

sleep 300
As you can see, the script's only function is to nap for 5 minutes! In spite of its laziness, the above script does illustrate how to give a name to a job, and how to give names to the files containing the output and error streams that are produced.
Submit the above script with sbatch, taking note of the job number:
$ sbatch simpleJob.sh
Monitor the progress of your job with one or both of the following Slurm commands:
$ squeue -u $USER
Now submit a second job that depends on the successful completion of the first.
$ sbatch -d afterok:<first_job_number> simpleJob.sh
We can ask, is Slurm able to estimate a start time for this new job?
$ squeue --start -j <second_job_number>
The answer is no; the dependency makes such an estimate impossible, because the scheduler cannot predict what will happen to the first job. For instance, we may choose to cancel the first job, so that the second job becomes free to run, subject to the prescribed dependencies:
$ scancel <first_job_number>
But remember that the second job is supposed to run only if the first one succeeds. So what now happens to the second job? Let's find out:
$ squeue -u $USER
This command may need to be repeated a few times. Eventually, you'll see that the job remains in a pending (PD) state, but the reason changes from "Dependency" to "DependencyNeverSatisfied". The job will stay that in that state indefinitely until you cancel it explicitly.
This means you have one final cleanup step to take care of:
$ scancel <second_job_number>
(Note that when a job is on indefinite hold like this, you can choose to release it back into the active queue instead of canceling it. This is accomplished with the scontrol release command; see man scontrol for details.)
This lesson has been modified from a course developed by members of the teaching team at the Harvard Chan Bioinformatics Core (HBC). These are open access materials distributed under the terms of the Creative Commons Attribution license (CC BY 4.0), which permits unrestricted use, distribution, and reproduction in any medium, provided the original author and source are credited.