Examining and creating files
Approximate time: 30 min
Learning Objectives
- View the contents of a file
- Create a new file using the Nano text editor
- Execute basic shortcuts in the Nano text editor
Examining Files
We now know how to move around the file system and look at the contents of directories, but how do we look at the contents of files? On your laptop, viewing a file is as simple as finding it in the file explorer window and double clicking to open it. As you will have noticed so far, the point and click of the mouse is not very useful when working on the command-line. Instead we will need to equip ourseleves with some helpful commands.
cat command
The easiest way to examine a file is to just print out all of its contents using the command cat. We can test this out by printing the contents of ~/unix_lesson/other/sequences.fa. Enter the command followed by the filename, including the path when necessary:
$ cat ~/unix_lesson/other/sequences.fa
The cat command prints out the all the contents of sequences.fa to the screen.
catstands for catenate; it has many uses and printing the contents of a files onto the terminal is one of them.
What does this file contain?
>SRR014849.1 EIXKN4201CFU84 length=93
GGGGGGGGGGGGGGGGCTTTTTTTGTTTGGAACCGAAAGGGTTTTGAATTTCAAACCCTTTTCGGTTTCCAACCTTCCAAAGCAATGCCAATA
>gi|340780744|ref|NC_015850.1| Acidithiobacillus caldus SM-1 chromosome, complete genome
ATGAGTAGTCATTCAGCGCCGACAGCGTTGCAAGATGGAGCCGCGCTGTGGTCCGCCCTATGCGTCCAACTGGAGCTCGTCACGAG
TCCGCAGCAGTTCAATACCTGGCTGCGGCCCCTGCGTGGCGAATTGCAGGGTCATGAGCTGCGCCTGCTCGCCCCCAATCCCTTCG
TCCGCGACTGGGTGCGTGAACGCATGGCCGAACTCGTCAAGGAACAGCTGCAGCGGATCGCTCCGGGTTTTGAGCTGGTCTTCGCT
CTGGACGAAGAGGCAGCAGCGGCGACATCGGCACCGACCGCGAGCATTGCGCCCGAGCGCAGCAGCGCACCCGGTGGTCACCGCCT
CAACCCAGCCTTCAACTTCCAGTCCTACGTCGAAGGGAAGTCCAATCAGCTCGCCCTGGCGGCAGCCCGCCAGGTTGCCCAGCATC
CAGGCAAATCCTACAACCCACTGTACATTTATGGTGGTGTGGGCCTCGGCAAGACGCACCTCATGCAGGCCGTGGGCAACGATATC
CTGCAGCGGCAACCCGAGGCCAAGGTGCTCTATATCAGCTCCGAAGGCTTCATCATGGATATGGTGCGCTCGCTGCAACACAATAC
CATCAACGACTTCAAACAGCGTTATCGCAAGCTGGACGCCCTGCTCATCGACGACATCCAGTTCTTTGCGGGCAAGGACCGCACCC
>gi|129295|sp|P01013|OVAX_CHICK GENE X PROTEIN (OVALBUMIN-RELATED)
QIKDLLVSSSTDLDTTLVLVNAIYFKGMWKTAFNAEDTREMPFHVTKQESKPVQMMCMNNSFNVATLPAE
less command
cat is a terrific command, but when the file is really big, it can be annoying to use. In practice, when you are running your analyses on the command-line you will most likely be dealing with large files. In our case, we have FASTQ files. Let’s take a look at the list of raw_fastq files and add the -h modifier to see how big the files are.
$ ls -lh ~/unix_lesson/raw_fastq
The
lscommand has a modifier-hwhen paired with-l, will list the files and also print sizes of files in human readable format.
In the fourth column you wll see the size of each of these files, and you can see they are quite large, so we probably do not want to use the cat command to look at them. Instead, we can use the less command.
Move into our raw_fastq directory and enter the following command:
$ less Mov10_oe_1.subset.fq
Rather than printing to screen, the less command opens the file in a new buffer allowing you to navigate through it. Does this look familiar? You might remember encountering a similar interface when you used the man command. This is because man is using the less command to open up the documentation files! The keys used to move around the file are identical to the man command. Below we have listed some additional shortcut keys for naviagting through your file when using less.
Shortcuts for less
| key | action |
|---|---|
| SPACE | to go forward |
| b | to go backwards |
| g | to go to the beginning |
| G | to go to the end |
| q | to quit |
Use the shortcut keys to move through your FASTQ file, we will explore these files in more detail later in the workshop.
Searching files with less
less also gives you a way of searching through files.
Just type in / to begin a search, you will see that the / will show up at the bottom of the less buffer. Now, enter the name of the string of characters you would like to search for and hit the enter key. The interface will move to show you the location where that string is found, and highlight the string. If you hit / then ENTER, less will just repeat the previous search.
less searches from the current location and works its way forward. For instance, let’s search for the sequence GAGACCC in our file. You can see that we go right to that sequence and can see what it looks like.
If you start a search when you are at the end of the file, less will not find it. You need to go to the beginning of the file and search.
To exit hit q. There are other more sophisticated commands to search through your file (and we will cover these later), but this shortcut search is useful for a quick scan through. You can think of it as being analagous to using the Ctrl-F keystroke when searching on your laptop.
head and tail commands
There’s another way that we can look at files, and just look at part of them. In particular, if we just want to see the beginning or end of the file to see how it’s formatted.
The commands are head and tail and they just let you look at the beginning and end of a file respectively.
$ head Mov10_oe_1.subset.fq
$ tail Mov10_oe_1.subset.fq
By default, the first or last 10 lines will be printed to screen. The -n option can be used with either of these commands to specify the number n lines of a file to display. For example, let’s print the first/last line of the file:
$ head -n 1 Mov10_oe_1.subset.fq
$ tail -n 1 Mov10_oe_1.subset.fq
Exercise
- Change directories into
genomics_data. You can do this using a full or relative path. - Use the
lesscommand to open up the fileEncode-hesc-Nanog.bed. - Search for the string
chr11; you’ll see all instances in the file highlighted. - Staying in the
lessbuffer, use the shortcut to get to the end of the file. Report the three highlighted lines at the end of the file where you seechr11highlighted. - Exit the
lessbuffer and come back to the command prompt. - Print to screen the last 5 lines of the file
Encode-hesc-Nanog.bed. Report what you see as the output within the Terminal.
Writing files
We’ve been able to do a lot of work with files that already exist, but what if we want to write and/or create our own files? Obviously, we’re not going to type in sequence information for a FASTA file, but you’ll see as we go that there are a lot of situations in which we would need to write/create a file or edit an existing file.
In order to create or edit files we will need to use a text editor. When we say, “text editor,” we really do mean “text”: these editors can only work with plain character data, not tables, images, or any other media. The types of text editors available can generally be grouped into two categories: graphical user interface (GUI) text editors and command-line editors.
GUI text editors
A GUI is an interface that has buttons and menus that you can click on to issue commands to the computer and you can move about the interface just by pointing and clicking. You might be familar with GUI text editors, such as BBEdit, Sublime, and Notepad++, which allow you to write and edit plain text documents. These editors often have features to easily search text, extract text, and highlight syntax from multiple programming languages. They are great tools, but since they are ‘point-and-click’, we cannot efficiently use them from the command line.
Command-line editors
When working remotely, we need a text editor that functions from the command line interface. With command-line editors you must navigate the interface using the arrow keys and shortcuts, since you do not have the option to ‘point-and-click’. Some popular editors include Emacs, Vim, or a graphical editor such as Gedit. These are editors which are generally available for use on high-performance compute clusters. There are also simpler editors available for use on the cluster (e.g. nano), but tend to have limited functionality.
Introduction to Nano
To write and edit files, we’re going to use a text editor called ‘Nano’. Nano is a simple, yet powerful tool for editing text files directly from the command line.
1. Introduction to Nano
Nano is a user-friendly text editor designed for Unix-like systems, such as Linux. It is often pre-installed on many distributions and is known for its simplicity and ease of use. Unlike more complex editors like Vim or Emacs, Nano provides a straightforward interface with on-screen shortcuts, making it an excellent choice for beginners.
In this course, you'll learn how to use Nano to create and edit files, navigate its interface, and perform common tasks efficiently.
2. Opening Nano
To start using Nano, open your terminal and type:
nano
This opens Nano with a new, empty file. To edit an existing file or create a new one with a specific name, type:
nano filename.txt
If filename.txt doesn't exist, Nano will create it when you save your work.
3. Basic Navigation
When you open Nano, you'll see a text area where you can type or edit content. At the bottom, there are two lines of shortcuts, where ^ represents the Ctrl key (e.g., ^G means Ctrl + G). Here's what the Nano interface looks like:
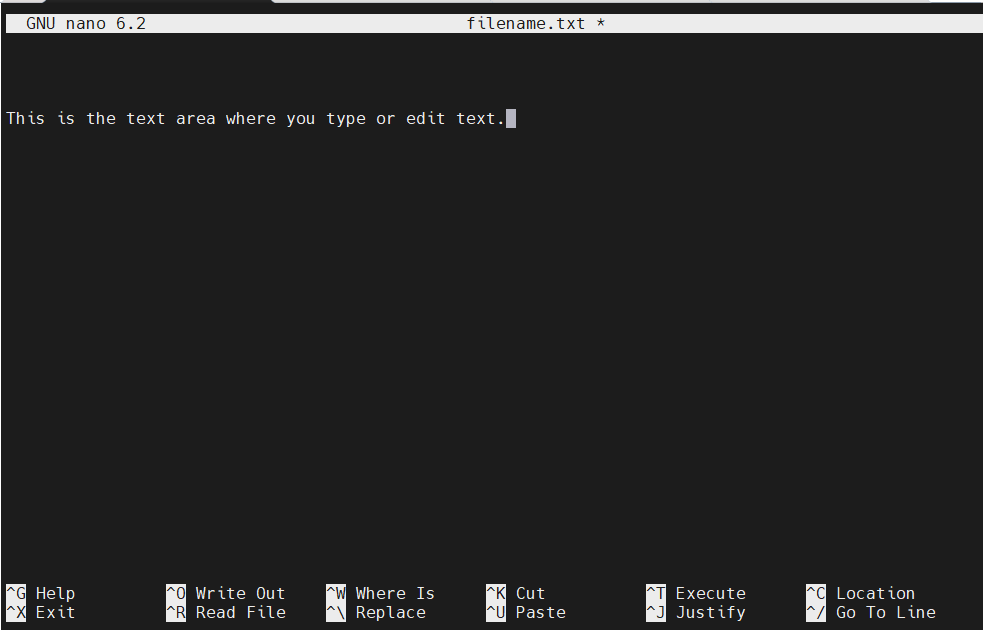
Use the arrow keys to move the cursor around the text. Additional navigation shortcuts include:
Ctrl + A: Move to the start of the current line.Ctrl + E: Move to the end of the current line.Ctrl + Y: Scroll up one page.Ctrl + V: Scroll down one page.
4. Editing Text
To add text, simply start typing. To remove text, use:
- Backspace: Delete characters before the cursor.
- Delete: Delete characters after the cursor.
For cutting and pasting:
Ctrl + K: Cut the entire line where the cursor is.Ctrl + U: Paste the cut text at the cursor's position.
Note: To cut a portion of a line instead of the whole line, see section 8 for text selection tips.
5. Saving and Exiting
To save your changes, press Ctrl + O. Nano will prompt you to confirm the filename at the bottom of the screen, like this:
Press Enter to save. To exit Nano, press Ctrl + X. If you have unsaved changes, Nano will ask if you want to save them before closing.
6. Search and Replace
To search for text in the file:
- Press
Ctrl + W. - Type your search term and press Enter.
- Press
Alt + Wto find the next occurrence.
To replace text:
- Press
Ctrl + \. - Enter the text to find, press Enter.
- Enter the replacement text, press Enter.
- Choose to replace one occurrence (Y) or all (A) by following the prompts.
7. Advanced Features
Nano can handle multiple files at once. To insert the contents of another file into your current one, press Ctrl + R and enter the filename.
If you open multiple files (e.g., nano file1.txt file2.txt), switch between them with:
Alt + ,: Go to the previous file.Alt + .: Go to the next file.
Nano also supports syntax highlighting, which colors code to make it easier to read. To enable this, edit the .nanorc configuration file in your home directory (advanced setup not covered here).
8. Tips and Tricks
Here are some handy shortcuts and features:
Ctrl + G: Open the help menu for a full list of commands.Ctrl + C: Show the current cursor position (line and column).Ctrl + _: Jump to a specific line number (Ctrl + Shift + - on some keyboards).- Text Selection: Press
Alt + Ato set a mark, move the cursor to select text, then useCtrl + Kto cut the selection. Alt + U: Undo the last action (in newer Nano versions).Alt + E: Redo an undone action (in newer Nano versions).
9. Practice Exercises
Practice these tasks to master Nano:
- Create a File:
- Type
nano hello.txtin the terminal. - Write "Hello, World!" and save with
Ctrl + O, then exit withCtrl + X.
- Type
- Edit a File:
- Open
hello.txtwithnano hello.txt. - Add a new line: "This is Nano."
- Save and exit.
- Open
- Search:
- Open
hello.txt. - Use
Ctrl + Wto search for "Nano".
- Open
- Replace:
- Use
Ctrl + \to replace "Nano" with "a text editor". - Save the changes.
- Use
- Cut and Paste:
- Move the cursor to the first line.
- Press
Ctrl + Kto cut it. - Move to the end and press
Ctrl + Uto paste. - Save and exit.
Congratulations! You've completed this Nano course. You now have the skills to edit text files efficiently in Unix-based systems. For more details, check out the official Nano documentation.
This lesson has been modified from a course developed by members of the teaching team at the Harvard Chan Bioinformatics Core (HBC). These are open access materials distributed under the terms of the Creative Commons Attribution license (CC BY 4.0), which permits unrestricted use, distribution, and reproduction in any medium, provided the original author and source are credited.